|
Diesen Artikel vorlesen lassen
Getting your Trinity Audio player ready...
|
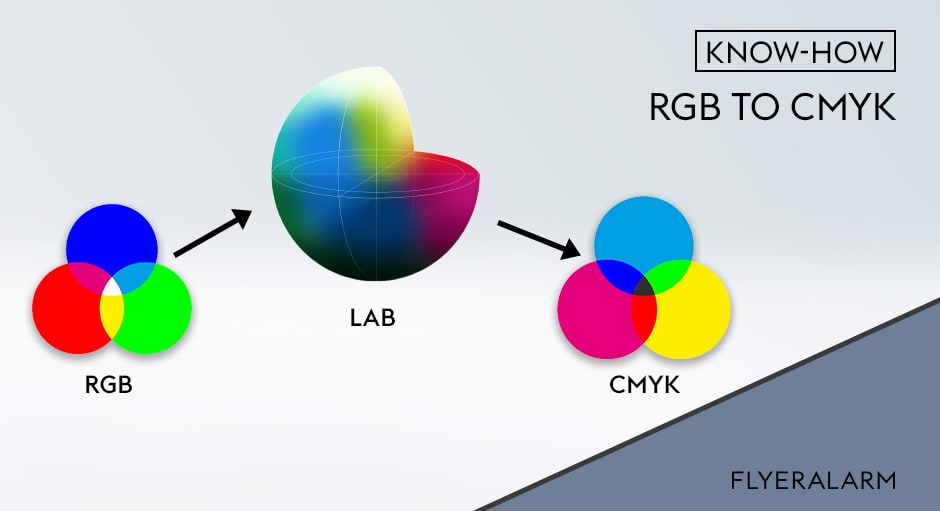
Before being printed, photographs and images must be converted from RGB to CMYK. The key aspect here is the lab colour space.
When images are displayed on the screen and other digital devices, the RGB colour space is used. In the world of print, however, CMYK is a prerequisite. Print files created in RGB on the screen must be converted to CMYK in order to be printed. Since these two colour spaces differ greatly not only in the way they represent colours but also in the number of colours they can represent, you have to use a common denominator to convert between them – the Lab colour space.
What is the Lab colour space?
The Lab colour space (also called CIELAB) contains all colours that can be perceived by the human eye. As a result, it is device-independent and media-neutral, excluding any device-specific properties. The coordinates L*, a* and b* allow any colour that is perceptible to the human eye to be represented, including those outside the limited RGB and CMYK colour spaces. The L* value indicates the lightness (0=black, 100=white), the a- value indicates a position on the red-green axis (+a=red, -a=green) and the b value is on the yellow-blue axis (+b=yellow, -b=blue).
These properties allow the Lab colour space to act as a profile connection space that can be used to convert colours between two colour spaces, such as RGB and CMYK.
How does the conversion work?
Print profiles are based on “characterisation” data, which characterises a given output condition.
In terms of the sequence of steps to be followed this means:
Defining the output condition: What is the print process? What is the paper type and what are the primary colours involved in the production? For the ISO Coated v2 profile, for example, these would be offset printing, coated paper and CMYK.
Creating characterisation data: The characterisation data must now be created for the chosen output. This is done by printing a colour chart (comprising many individual CMYK colour fields) with the corresponding output and using a spectrophotometer to measure the device colours. The result is a Lab value for each of the individual colour fields or CMYK values. The Lab values allow the colour space to be described precisely and form the basis for creating colour profiles.
In German-speaking countries, characterisation data are mostly created by the research institute Fogra (Forschungsinstitute für Medientechnologien e.V.). For example, FOGRA39 serves as the basis for ISO Coated v2.
Creating colour profiles: Colour profiles can now be calculated using the characterisation data. As described above, colour profiles allow conversion between RGB and CMYK, for example, via the media-neutral Lab colour space. However, they also describe in detail how the output colour values (e.g. CMYK) should be composed. The method for separating the colours depends on various technical print settings (e.g. ink limit or black composition). These separation properties have a direct influence on the creation of profiles and are the reason why there can be multiple print profiles for one set of characterisation data.
Ultimately a colour profile is created that supports the most accurate possible file conversion between the designer and the print shop.
In applications
If you are creating print files, in theory you should not need to worry about the steps outlined above. The only thing you need to know is the colour profile that your (online) printer prefers working with. Use this when creating your artwork to ensure the most accurate possible impression of the printed result, in your soft proof, for example.